Systems up or down


Shared Mailbox/Calendar & Distribution Lists (DL)

Shared Mailboxes can be utilised for a number of reasons:

  • a central/single email address for people to contact a team/group
  • an owner(s) has control over whom can access and use the Shared Mailbox
  • multiple people can be given access to monitor the mailbox
  • people can be given permission to send from the mailbox, so all correspondence remains in the Shared Mailbox

Shared Calendar can be utilised for a number of reasons:

  • a central/single calendar used to book rooms or equipment
  • an owner(s) has control over whom can book the Shared Calendar
  • these can be locked down, so someone/group has to approve booking before they are finalised in the calendar

Distribution Lists (DL) can be utilised for a number of reasons:

  • a central/single email address for correspondence to be sent to a certain group of people
  • an owner(s) has control over whom is part of the DL
  • DL can be locked down so only certain people e.g., PVC can email it or the members within the DL can utilise it

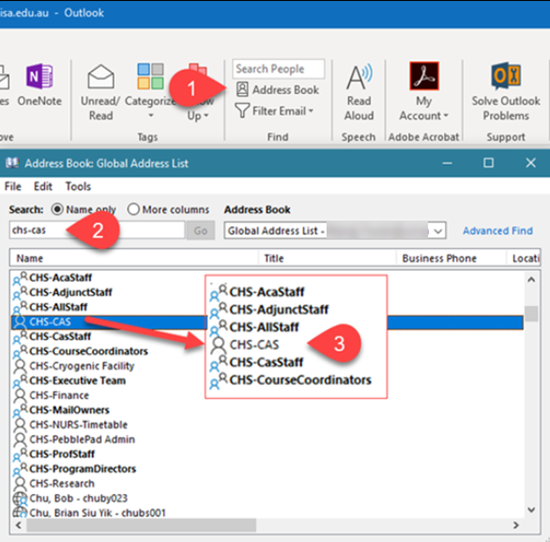
To determine if the email account is a Shared mailbox or a Distribution List (DL)

  1. In Outlook open the Global Address Book (GAL)
  2. Find the email account name
  3. If the email account name is accompanied by an icon with a single head as the example shown below or CHS-CAS then it is a Shared mailbox. If it has an icon with multiple heads (as CHS-AllStaff has) then it is a Distribution List. 
    mailbox-dl-sm.png

  1. Close Outlook
  2. Go to Control Panel and click Mail.
  3. Click E-mail Accounts.
  4. Click New on next window.
  5. Leave Office 365 selected and enter the Shared Mailboxes email address.
  6. Click Next.
  7. Tick Don't ask me about this website again on Microsoft Outlook pop-up and click Allow.
  8. Congratulations message will appear, click Finish.
  9. Close all windows and open Outlook.

Step-by-step instructions (including screen shots) can be found on the Opening a Shared Mailbox in Outlook so sent items will go to that mailboxes sent items page.

Send on Behalf

Allows a user to send as another user or mailbox while showing the recipient that it was sent from one user on behalf of another. More commonly used for another staff member, than shared mailbox. Any replies to these emails will be sent directly to the staff member who the original was sent on behalf of.


Send As

Allows a user to send as another user or mailbox without showing the recipient who initiated the email.

To Send on Behalf or Send As:

  1. Start a new email
  2. Click From
    NOTE: To enable the 'From' box - Once enabled it will always be available:
    1. Start a new email
    2. Click the Options tab
    3. Click From under the Show Fields section
  3. From the dropdown list click Other E-mail Address

NOTE: Staff email profiles are by default called UniSA Exchange. So if UniSA Exchange is listed to the right of From then the email will be sent from your staff email address.

  1. Enter desired email address or click Find and locate it in the Address Book
    NOTE: Once entered, in the future you can just select the email address from the dropdown in Step 3.
  2. The email will now be sent from the email address listed to the right of From

NOTE: Staff email profiles are by default called UniSA Exchange. So if UniSA Exchange is listed to the right of From then the email will be sent from your staff email address.

Or step by step instructions (including screenshots) can be found on the 'Send on Behalf' or 'Send As' page.

Send on Behalf

The staff member you need to send emails on behalf of needs to grant you this permission through Delegate Access.

Send As

You need to contact the owner(s) of the Shared Mailbox.


NOTE: Internet Explorer 11 or FireFox are the recommended browsers for doing this.

  1. Log into Outlook Web App (OWA)
  2. Click your Profile/Portrait in the top right corner
  3. Click Open another mailbox...
  4. Enter Shared Mailbox name or email address
  5. Click Open
  6. Use OWA to read/reply/send emails through Shared Mailbox 

For step by step instructions (including screenshots) see open Shared Mailbox through Outlook Web App (OWA) page.

NOTE: Internet Explorer 11 or FireFox are the recommended browsers for doing this.

  1. Log into Outlook Web App (OWA)
  2. Click your Profile/Portrait in the top right corner
  3. Click Open another mailbox...
  4. Enter Shared Mailbox name
  5. Click Open
  6. Click Settings (the cog) top right
  7. Click Set automatic replies
  8. Select
  9. Enter/edit Out of Office message
  10. Ensure is ticked and is selected
  11. Copy and paste Out of Office message from Step 7
  12. Click Save


Or for step by step instructions (including screenshots) see Putting Out of Office on through Outlook Web App (OWA) page.

To enable a redirection of ALL emails entering a mailbox to another specified mailbox follow the step-by-step instructions. These also cover how to setup an out of office reply to ALL emails entering a mailbox. This informs users of the updated email address. The instructions are complex so please read through first.

If you are not sure on any of the instructions, please contact the IT Help Desk.

Step-by-step instructions (including screen shots) on how to redirect all emails received by a Shared Mailbox page.

For Distribution Lists:

  1. Obtain relevant authority (i.e., General Manager for AU’s) to have the distribution list retired.  This can be via email
  2. Modify any related business processes
  3. Communicate to any affected customers when/has been retired and appropriate alternative (if applicable)
  4. Log a request through to the IT Help Desk with the necessary authority attached and listing of what distribution list/s can be retired.

For Shared Mailboxes:

  1. Obtain relevant authority (i.e., General Manager for AU’s) to have the shared mailbox retired.  This can be via email
  2. Modify any related business processes
  3. Communicate to any affected customers when/has been retired and appropriate alternative (if applicable).  This may also include putting on a redirect for all messages and out of office notification.  See 'How do you redirect all emails on a Shared Mailbox' for detailed instructions.
  4. If you would like a capture/backup of the current contents of the shared mailbox include this in your service request
  5. Log a request through to the IT Help Desk with the necessary authority attached and list the shared mailbox

To copy content from one Shared mailbox to another you will need to have both Shared mailboxes added to your Outlook profile.

Then you can simply traverse to one Shared mailbox and drag and drop into the other.

For more information on adding a shared mailbox see Opening a Shared Mailbox in Outlook so sent items will go to that mailboxes sent items

Note: Prior to relocating the content from the OLD to NEW shared mailboxes, the Owner will need to review the mailbox permissions:

  1. How to determine the owner of a Shared Mailbox?
  2. How does the owner provide staff access to a Shared Mailbox?

If you require assistance with any part of this process, contact IT Help Desk